
I am happy to present my project called Snapsight! What is it, you may ask? Well, over the last two or more months I created a proof of concept app for a phone aimed at assisting visually impaired people by describing their environment for them. It’s similar to the service hosted by bemyeyes.com, but with an AI LLM describing the images instead of a person. (apologies for using two buzzwords in one sentence)
Below is a quick screen recording demo of the app in action. The sounds start playing as soon as the audio is ready, so the first part of the video does not contain any sound. For the demos, I kept the phone on the scene being described; however, one can normally just lock their phone or continue doing something else while the scene is described. This is because the description is based on a photo and not live video.
As you might have seen from the video above, the interface design of the app is… well, non-existent. I specifically wanted to make the app as easy to use as possible. So, in this version, at least, the only input required is the screen itself. The user only needs to tap anywhere on the screen to take a photo. Then, a couple of seconds later, a description of the scene will be played back to the user. Simple as that! Then rinse and repeat.
Why?
I’m sure the question of ‘why’ might come to mind as you read this. Why would I build such an app? To be honest, I cannot pinpoint exactly when or how I came up with the initial idea. I just remember it appeared as a challenging technical project to tackle, and I wanted to see if I could create it. As the saying goes, I did it not because it was easy, but because I thought it would be. However, once I started, I was committed to seeing the project through to the end. Mind you, this is still a very bare-bones proof of concept, and getting it to this stage took much longer than I initially thought. Yet, I am happy with the end result.
Possible use cases:
- Art appreciation: Visually impaired users could visit art galleries or museums where the app describes artworks in detail, including colors, composition, and the emotions they might evoke, enhancing cultural experiences.
- Nature walks: While on a nature trail, the app could describe the natural surroundings, including types of trees, flowers, and the layout of the path, enriching the experience of nature walks.
- Home gardening: For those interested in gardening, the app could describe the growth of plants, the condition of soil, or the presence of pests, supporting gardening activities.
- Fashion assistance: The app could help users select outfits by describing clothing colors, patterns, and styles from their wardrobe, facilitating independent fashion choices.
- Public transportation: While using public transport, the app could describe the surroundings, helping users identify bus numbers, train station features, or the general busyness of the area.
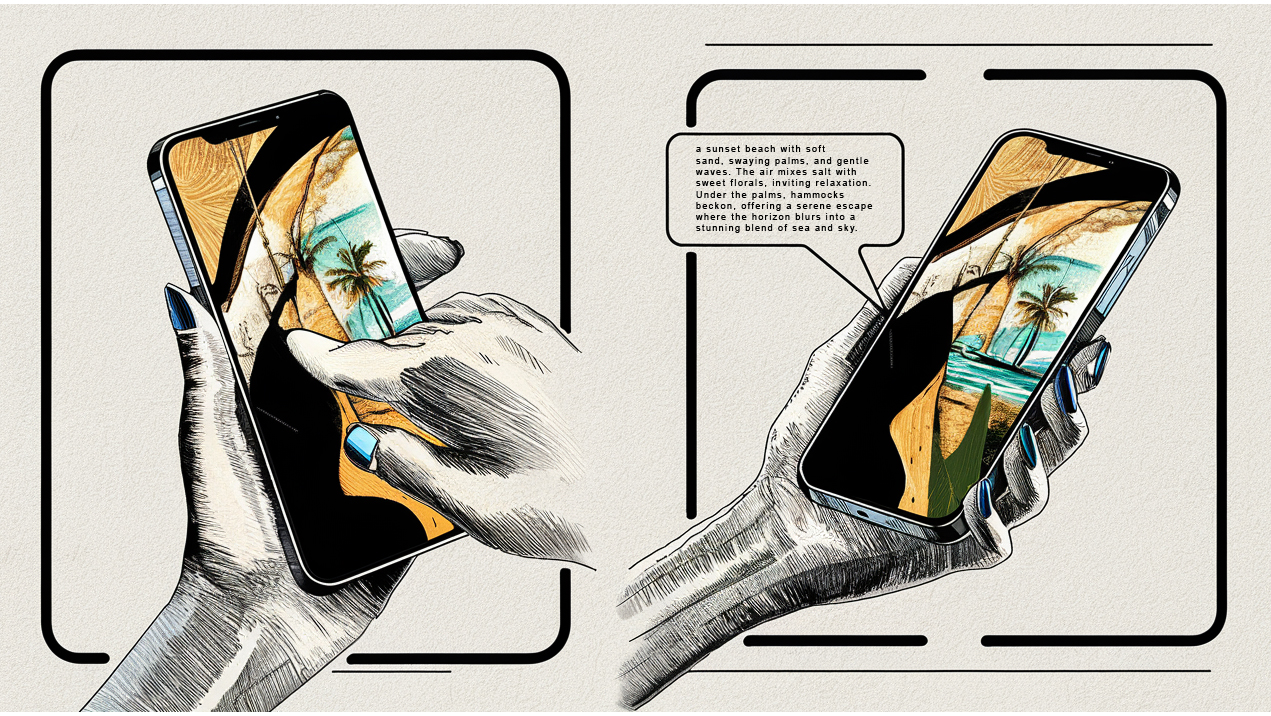
- Beach days: For a day at the beach, the app can describe the scene, including the color of the sky, the state of the sea, the types of activities happening around, and even the sunset, enhancing the sensory experience.
- Assistive shopping: In a shopping environment, the app can describe displays, store layouts, or the appearance of products, aiding in the selection process without needing to identify specific items or read labels.
- Assistive device for writers: Visually impaired writers could use the app to gather detailed descriptions of various settings for their stories or poems, aiding in creating vivid imagery for their readers.
- Assisting with locating misplaced items: Visually impaired users can use the app to search for items like keys or wallets by pointing their phone across different areas.
Since this is just a proof of concept I haven’t asked any visually impaired people to test out this app, so I’m sure real-world use cases might be completely different.
Tools and Services
From here on out things might start to get a bit more technical so bare with me as I recall the process from start to finish.
Some technologies I used in this project where, in no particular order:
- Ubuntu the linux OS I used on both my local VM and cloud server
- Vmware to host my initial test api server before moving it to a cloud based one.
- github to store code that was being pulled into the docker image during startup. Also for backups.
- huggingface to pull some models and weights from
- Runpod for my cloud GPU hosting
- aws
- ollama for hosting llms for vision
- llava, the vision llm I used locally to describe images
- GPT-V(ision) from OpenAI via the api for describing images
- tmux a very handy tool to keep your processes running without having to leave your terminal open (&++)
- Anaconda when I needed to run multiple versions of python and packages in the same environment
- OpenVoice a potential option I experimented with for voice cloning and TTS
- Mimic3 a fast and local neural TTS system, possible for edge device usage.
- Android Studio for creating the android app
- Jupyter for running notebooks and some cmd terminals
- docker to build initial containers constraining the api,llm and vision models
- Packages like:
- Nvidia’s CUDA for Linux, do not get me started!
- A lot of python, bash, java/kotlin scripting
- GPT, Gemini and Claude for coding assistance and reminding me of their limitations.
- Coffee and late nights.
Possible AWS integration.
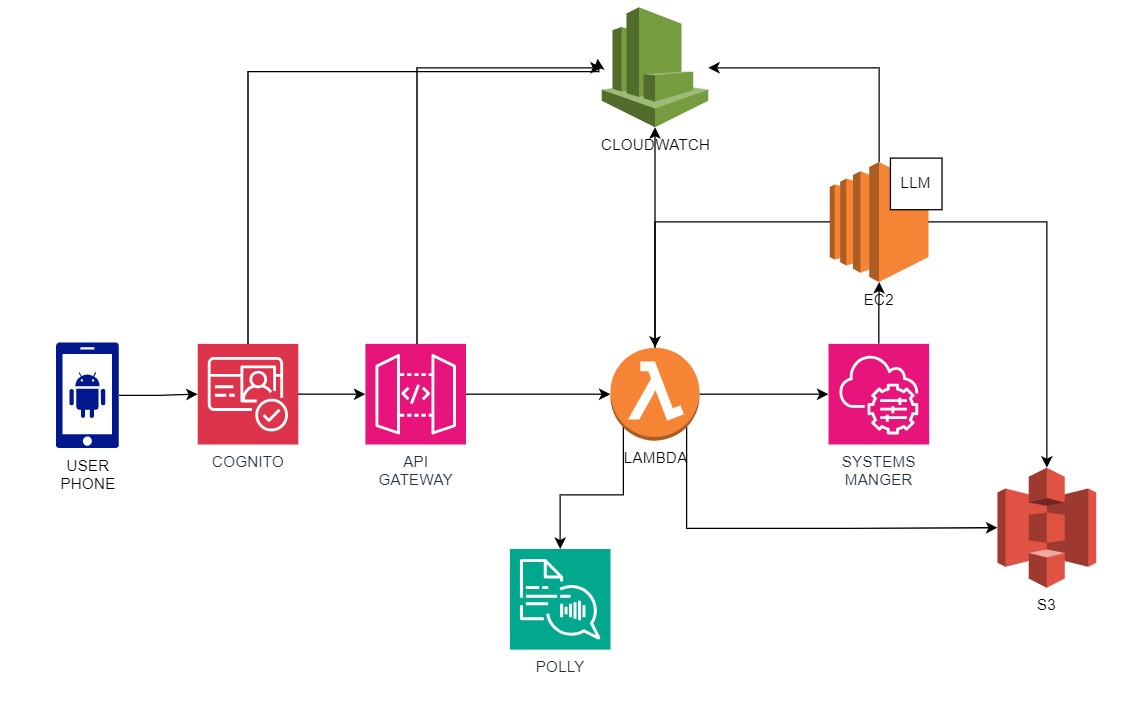
Below is the AWS architecture I had in mind, which I was really aiming to implement. However, the costs were a bit too high for my liking. Had I pursued this route, the user would have authenticated using AWS Cognito, from where the photo would be sent to an API Endpoint. The API Gateway, in turn, would have forwarded the photo to an AWS Lambda function, which would then upload it to an S3 bucket and call the LLM hosted on an EC2 instance to process and describe the image. The resulting text could be sent back via AWS Systems Manager or stored on S3, where Lambda could retrieve the text description. From there, Lambda could invoke Polly for text-to-speech conversion, producing the audio MP3 file to be sent back to the user. I also considered using AWS CloudWatch to keep a log file of all events.
Testing locally
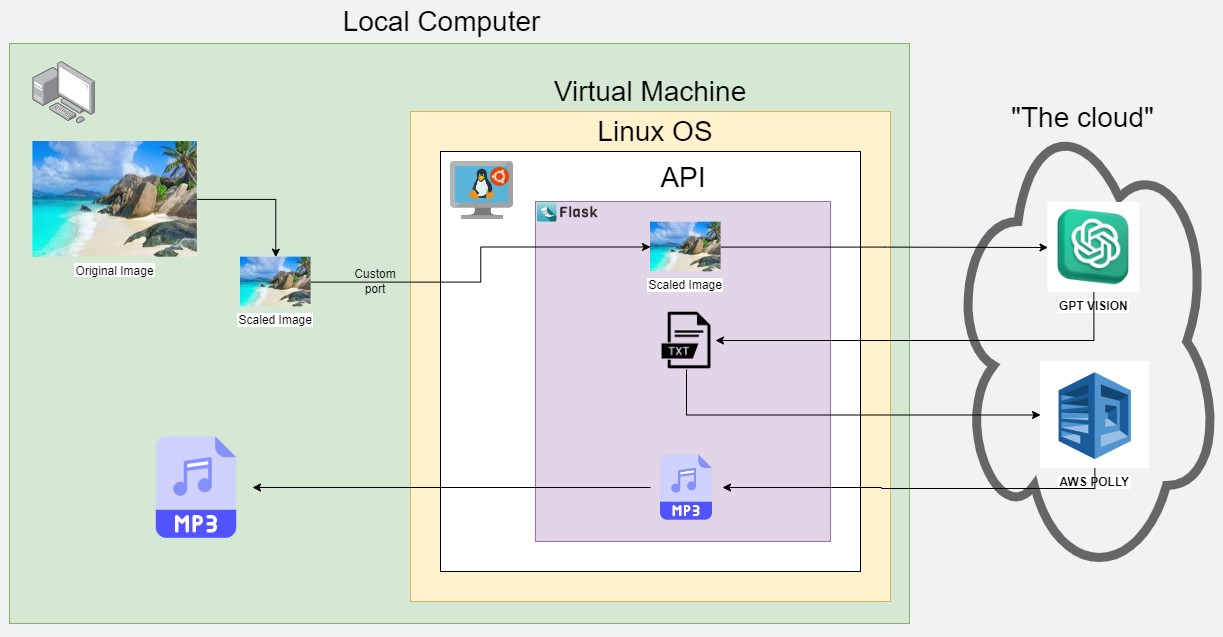
Initially, I wanted to test the “app” concept quickly to see if this idea would work before attempting to make it into an actual app. To facilitate this, I made use of some cloud-based APIs. I used GPT Vision for describing the images and AWS Polly to convert the description into an audio file. But, let me back up a bit.
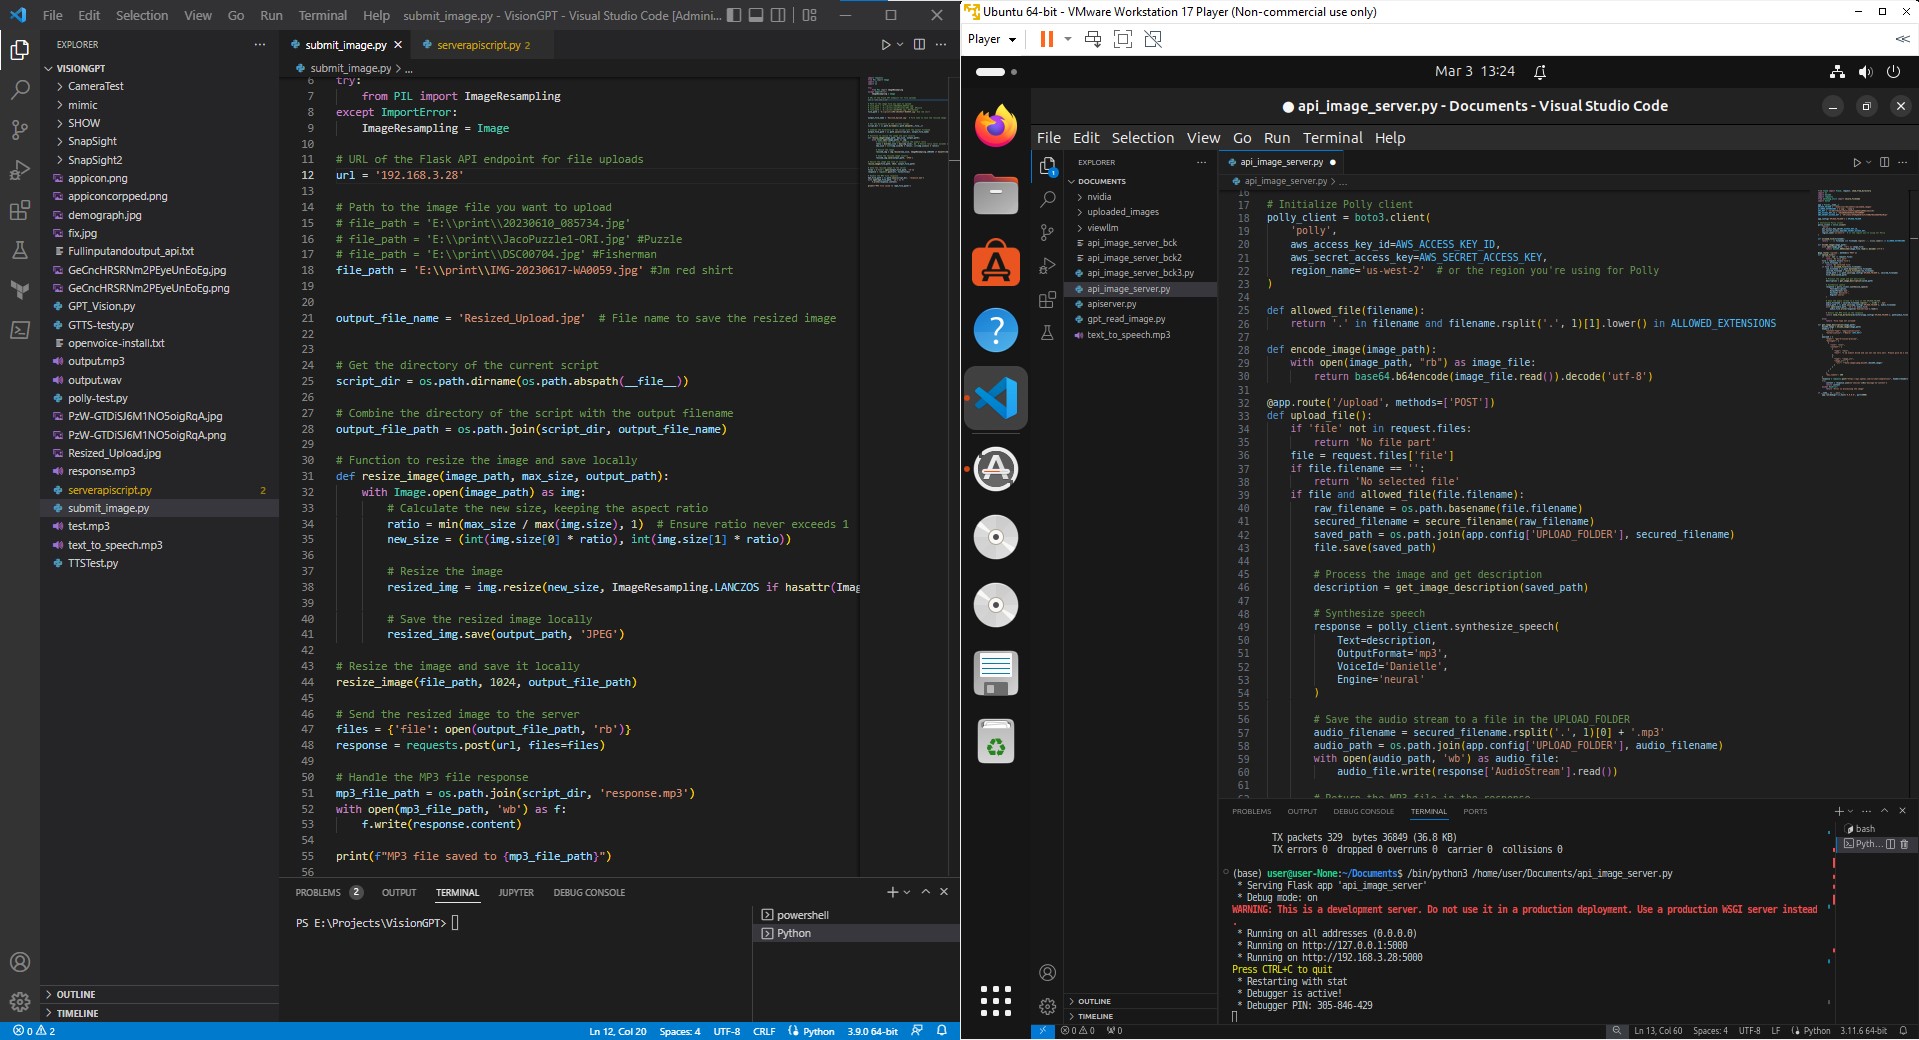
It all starts with an image on my local computer. Anticipating that the image would eventually need to be tokenized, I scaled the image down to find the best balance between token size and the LLM’s ability to understand the scene depicted in the image. I discovered that 1024×1024 pixels was the ideal size. From there, I sent the image to my local API, which was hosted on a VM running Ubuntu and utilized Flask – another application I had not worked with before. The API would take the image and make an API call to the OpenAI GPT Vision model to describe the image, returning a text JSON output. I extracted only the text description from this and then called AWS Polly’s API to convert the text into an MP3 file, which I then saved in a folder inside the VM. Once saved, I used the API I’m running locally to send the MP3 file back to my local computer, where it was stored in the same directory from which I ran the “submit_image” Python script.
Below is how it looked in practice while I was testing out the concept. My computer running visual studio code on the left and the VM running VSC to host the API.
Moving to the cloud
After testing a working version locally, I wanted to move things to the cloud. I also wanted to save on costs since I was being charged for each API call to OpenAI and AWS. So, I decided to move things a bit more in-house by swapping out GPV for a local LLM that is also capable of describing images (LLAVA). And swapping out AWS’s Polly for Mimic3, a model that can be run on low-end devices but still have decent inference times. I did play around with OpenVoice; however, this model did not sound very well, and I could basically just use Google’s TTS engine, which sounds like a robot.
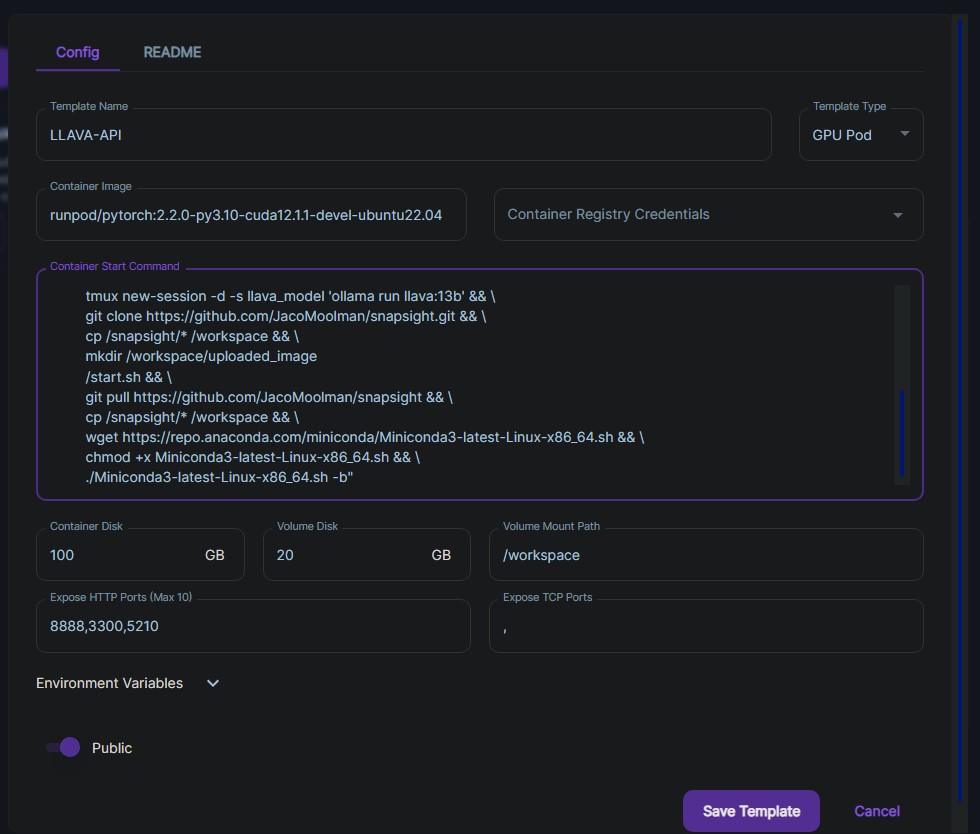
So the new layout starts from an Android phone instead of my local computer. I decided to use RunPod as my cloud GPU provider as it was relatively easy to set up, and you know what you are paying for, unlike some other larger cloud providers. I initially wanted to create my own serverless template that would be spun up every time a call was being made to it. This would have saved some costs as the instance only runs for as long as it’s being used. Also, should I ever decide to make this public, it would then be able to spin up multiple instances depending on demand. However, I opted not to go for this setup, as first building a working Docker image that you then had to associate with the serverless template was a hassle. And since this was only a proof of concept, I just decided to add all the Docker startup commands in the template itself instead of trying to build one from scratch. In the Docker image, I loaded all of the software, tools, and packages I would need to run my little cloud server. Some include Mimic3, Ollama, LLAVA, Anaconda, Flask, Tmux, and my own code I pulled via git from my GitLab account.
This is the backend of the pod, where instead of creating my own docker image I simply added all the docker start commands in the runpod template directly.
During the startup, I had to start several services and place them in the background using tmux. These included three for Ollama and one for the API itself. Once the server was running, it was ready to accept calls via the Flask API I set up. When the user taps on the screen, the app scales down the image. In this case, it would not matter much how large the image is since all processing is being done “internally,” meaning no outside API calls are being made. However, I did find there is a longer delay in transferring the image to the RunPod cloud server if the image is not scaled down. The app then makes an API call to my RunPod server via a custom port I set up. Once the image has been received, a script is run to call LLava to describe the image. This, in turn, is hosted inside Ollama, a nice wrapper that you can use to host LLMs locally (or in the cloud). I initially attempted to run LLava directly by installing and configuring it from their GitHub repo; however, there were too many conflicts with the Docker image. I opted to test with the 13 billion parameter model, but the final demo was done with the 34 billion parameter model to get better descriptions of the images. I had to upgrade the RunPod module to a higher-end GPU to host the model as it required about 40GB of VRAM.
A text description of the image is then generated by LLava and saved in a specific folder along with the original image. Flask then calls another script to convert the text into audio. I used Mimic 3 for this; however, I had to run this in its own Anaconda environment since it required a lower version of Python, 3.9 versus 11, that the Docker image came with. I first attempted to call Mimic3 via the “conda run” command; however, I ran into an issue where the audio file was generated but was silent. I “fixed” this bug by writing a bash script to activate the conda environment, run Mimic3 to generate the audio, then deactivate the environment again. Not the best solution, but it worked.
After that, Flask called one last script to convert the WAV file to an MP3 file via FFmpeg. Then it was a simple process to return the MP3 file to the app. Well, I say simple, but I needed to play around with the timeout of the app calling the API as initially, the app did not wait for the MP3 file and simply said file not found. From there, the app would then automatically play the received MP3 file for the user.

 Here is my “pod” from runpod going Brrr.. I ended up testing with an RTX A4000 with 16GB VRAM and a RTX A6000 with 48GB of VRAM for the final demo.
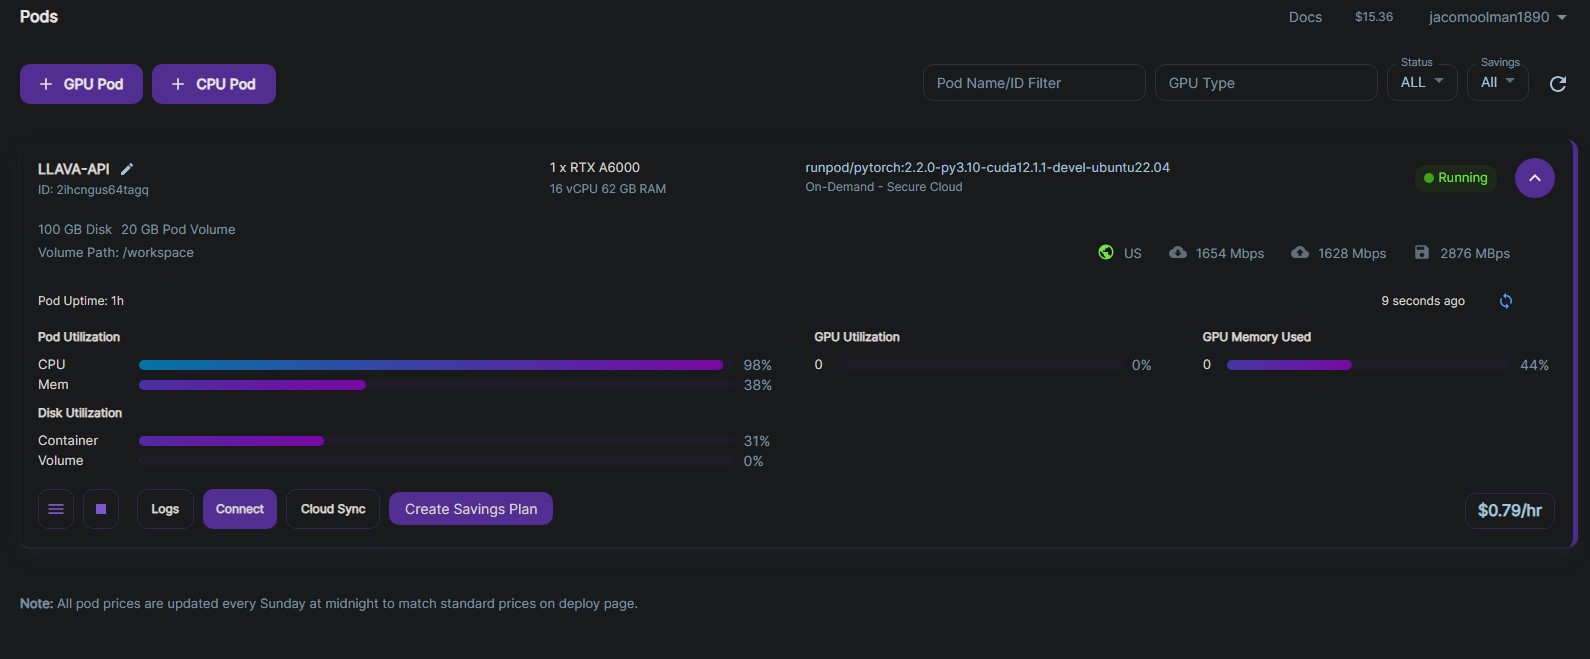
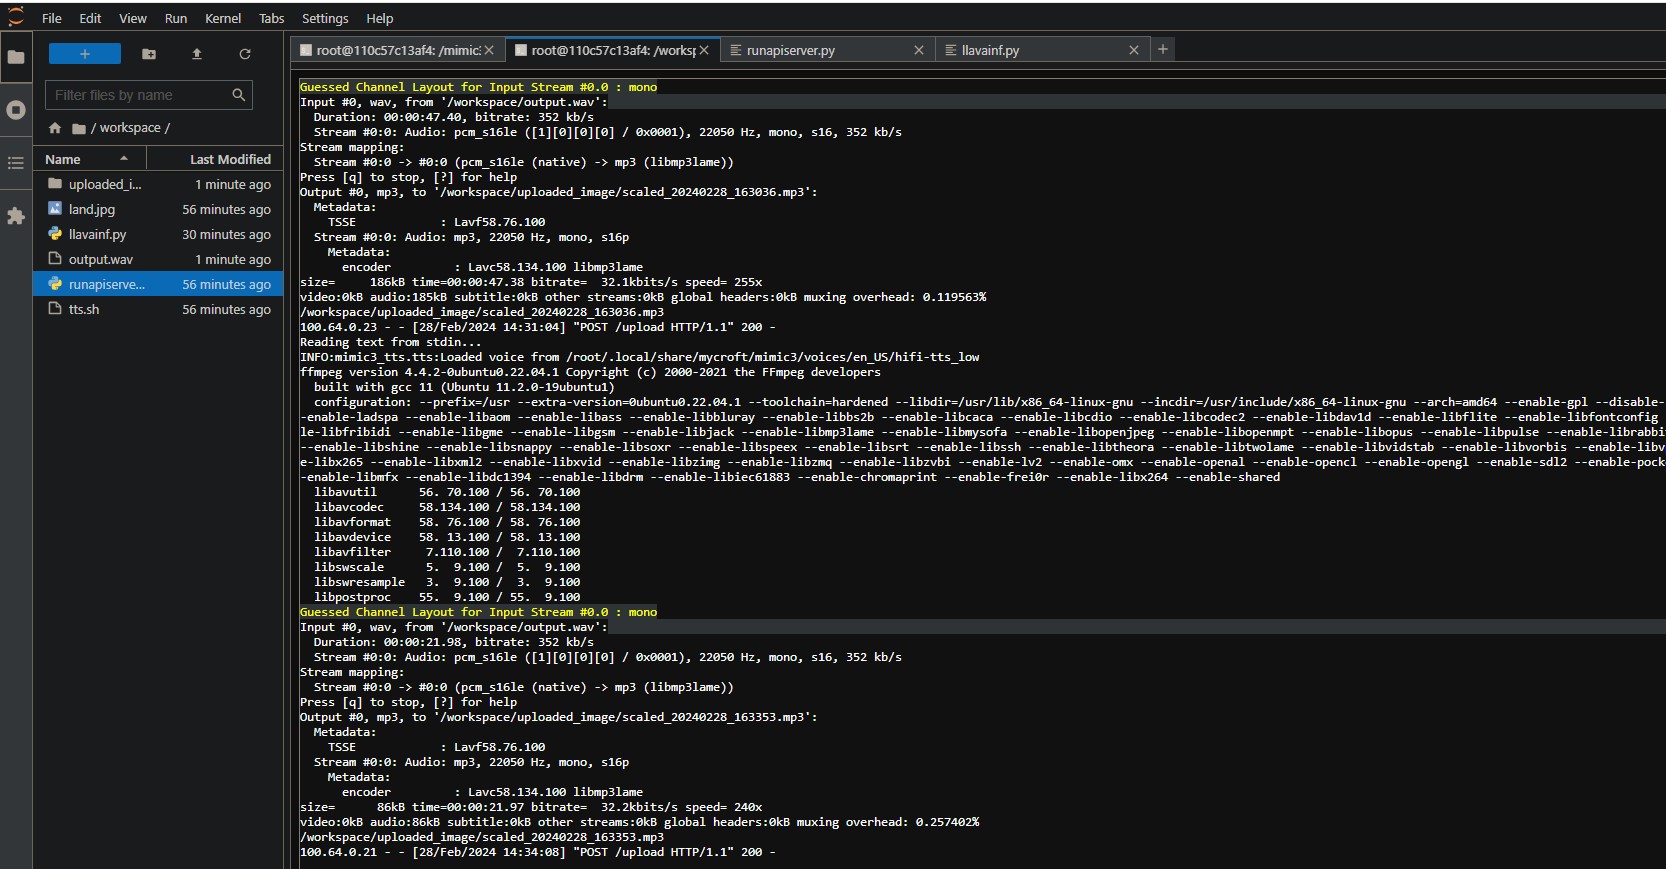
Below is a screenshot of the cloud server/pod running the API that the app connects to. I could have also run this in the background, but it was nice to have it open for troubleshooting. I found using Jupyter quicker than just a plain Linux terminal.
Android development
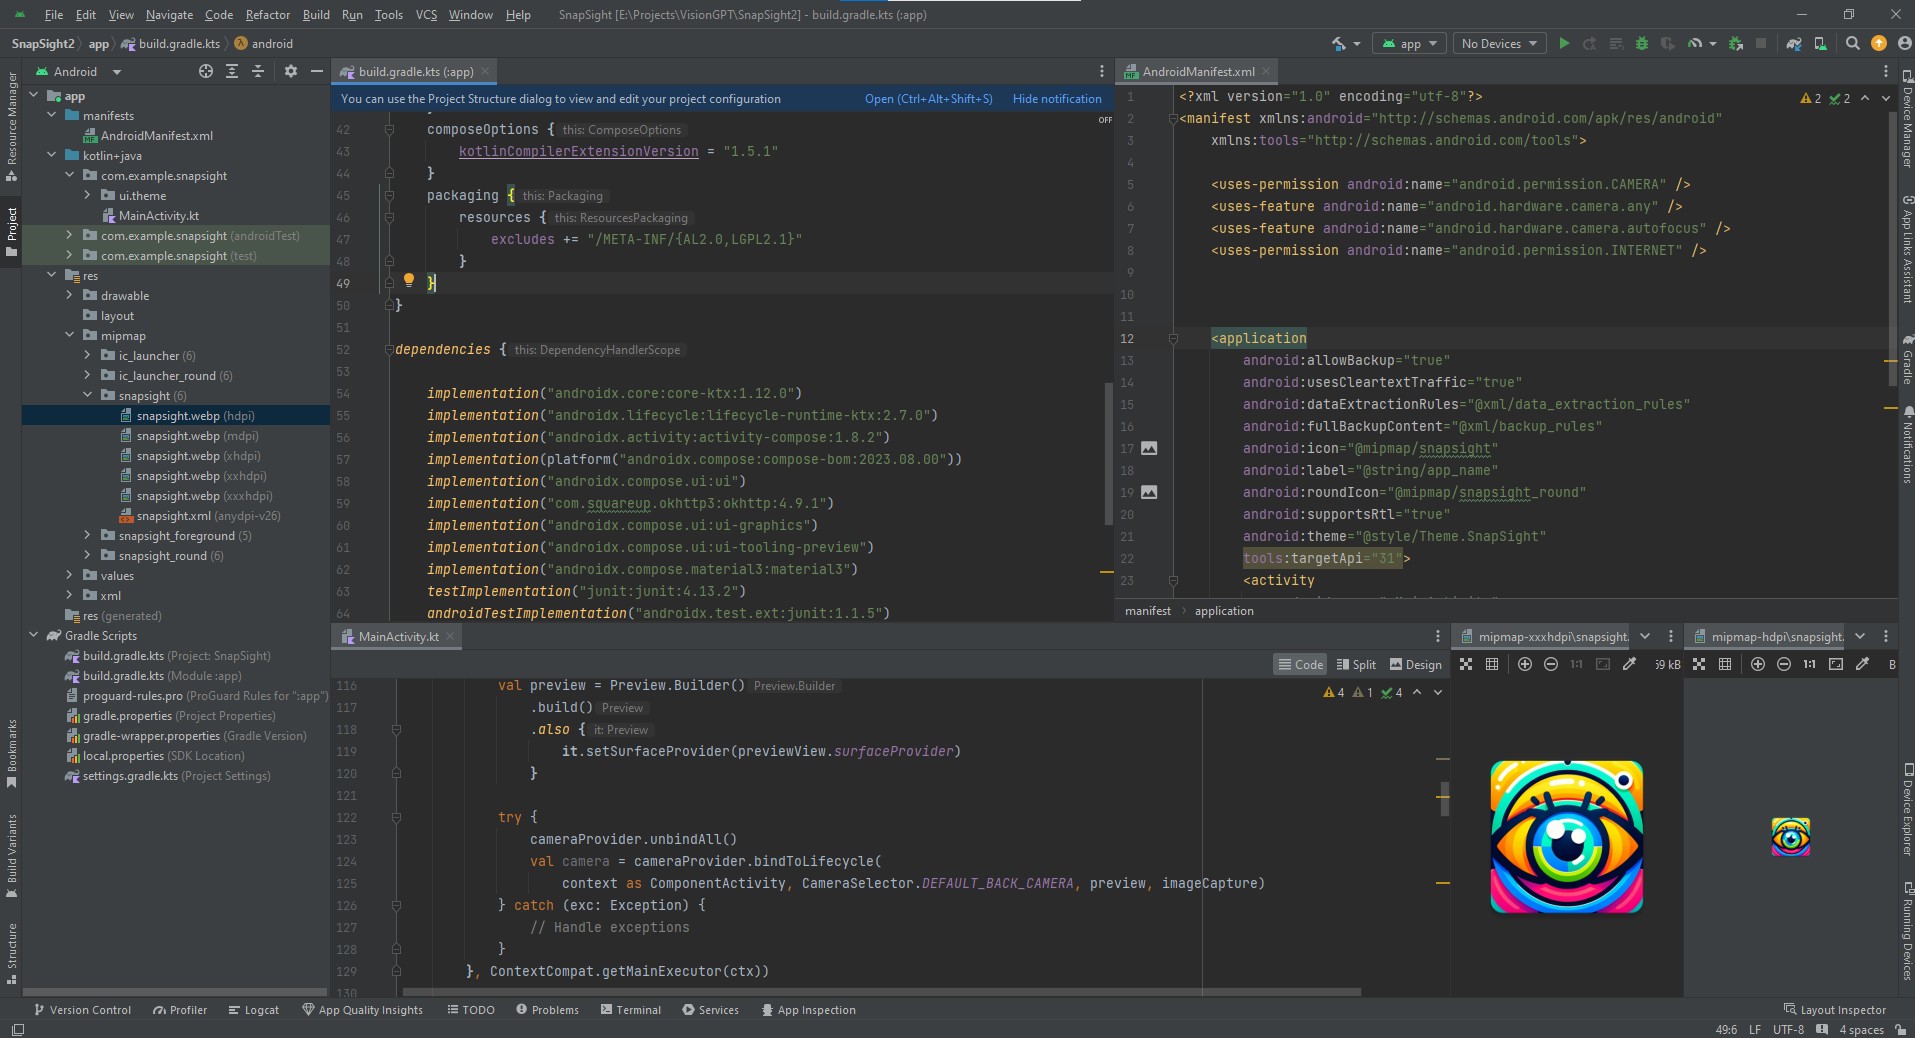
![]() And now, the fun part: the Android section of this little project. Learning Studio and Java/Kotlin for the first time from scratch was interesting, and I’m happy to say, I don’t think I’m cut out to be an app developer.
And now, the fun part: the Android section of this little project. Learning Studio and Java/Kotlin for the first time from scratch was interesting, and I’m happy to say, I don’t think I’m cut out to be an app developer.
GitHub Code
For those wanting an even deeper look into the backend here is a link to the code I pulled into the docker image on each startup.

Possible future enhancements
I mentioned this was just a proof of concept. I did play around with some enhancements; however, that rabbit hole might never find a bottom until it’s listed on the stock market or bought out by <billionaire’s name here>. However, some additional features for possible future versions might be:
User/Business Perspective:
- Ability to clone someone you know’s voice to describe the images.
- Describe a photo taken in the past. The user might want a description of a photo that was sent to them.
- Integrating into other applications and screen annotations. Perhaps help the user navigate the mobile interface itself.
- Select different dialects and languages as English and the rather British voice is the only option.
- Instead of showing the camera, the still image can be displayed should someone want to compare what is being described with the image taken.
- Instead of a photo, a video or stream of photos can be continually processed, described, perhaps offering a hands-free option by not having to press the screen for every description.
- Have the app take a range of images and describe an action instead of just a static image. Say a kid running and kicking a goal in a park, or a dog attempting to catch a ball but then missing it mid-jump.
- After an initial description of an image, the user can verbally ask follow-up questions. For example, “Do you see keys in this photo?”, “What is the expiry date on this milk?” or anything specific that the initial description did not provide.
- Enable facial recognition. Perhaps have an additional model learn the faces of loved ones, thus enabling the app to describe the persons in a photo.
- Add sounds as guidance. Since this app is aimed at visually impaired, adding sounds to indicate different modes or statuses can be helpful.
Technical Perspective:
- Instead of connecting to a cloud server, all processing could be done on the phone itself. One would need a rather powerful phone, but this is actually possible with today’s technology.
- Improve the latency of the app. At the moment, the response is about three or four seconds, but this is a long time if you say want to know if the street is clear to cross.
Additional examples from SnapSight
I did a couple more tests in and around the house to see what output I would get. This obviously would be highly dependent on the backend setup and the LLM you use to describe the image. All in all, I’m rather happy with the results.
I tested the app in our communal garden in portrait mode using a 4G connection. The latency was still about 3 – 4 seconds.
No I can not play a single note. All credit goes to my partner who fills the house with musical joy.
I also decided to test a couple of other scenarios I did not have immediate access to so I went the old school way of just pointing my phone at my computer screen.
Pizza Time
Beach Time
App release date?
So, when will this app be available? Well, at this point, I do not intend to make it public. The amount of work and effort it would take to turn this into a full-fledged product would take a considerable amount of time. And I’ve already set my sights on my next big project(s). Just loading this app on the app store is another headache I prefer not to have. Not to mention setting up multi-processing for more than one user at a time.
Another reason would be that it seems the big players are slowly getting their collective rear ends in gear and offering similar functionality, albeit with a lot more steps and sometimes even worse results than using a local LLM (LLAVA) in this case.
For example, here is a screen recording of Google’s Gemini and GPT. In both cases, I had to go through much more effort to get a description of an image.
Gemini: GPT:
Conclusion
All in all, I had a lot of fun during this process. I learned a lot about creating an end-to-end platform and will be using my newfound knowledge in future projects. Using modern tools like GPT and Claude to speed up your productivity does help a lot, and I honestly cannot see any developer or engineer keeping pace without using these modern tools.
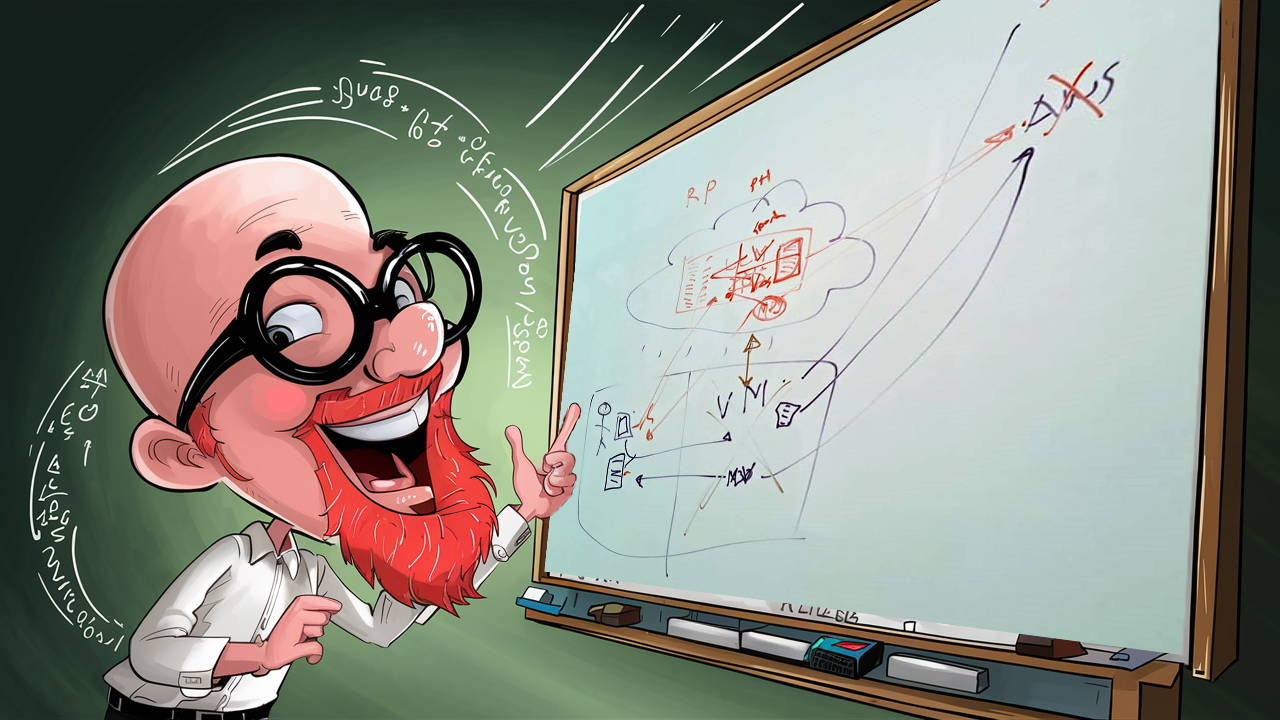
And to end off, here is an accurate depiction of me and the drawing I made trying to explain to my partner the inner workings of the app. To her credit, she actually followed most of it.
And now me and my new best friend finally developed our app! Thank you for your time